Ellipses And Arcs
The Ellipse Tool allows the drawing of ellipses, circles, and arcs.
Draw an ellipse
Select the Ellipse Tool from the main Toolbox along the left side of the window (or use a keyboard shortcut E or F5)
Hold the primary mouse button and Drag the mouse diagonally over the canvas until the desired size/shape is achieved. Then release the mouse button.
The starting point will be one of the bounding box corners. The end point of your drag will be the opposite bounding box corner. And your new ellipse will be inside the bounding box.
While dragging, you can hold these modifier keys to constrain the ellipse in different ways:
Hold CtrlCmd while dragging to constrain the ellipse to set ratios of the bounding box, such as 1:1 (circle), 1:1.618 (Golden Ratio), 1:2, 2:1 and so on.
Hold Shift while dragging, to center the ellipse to the point where the Left Mouse Button is first clicked
Hold AltOption while dragging, to create an ellipse with the circumference passing through the start and end points of the drag.
Hold AltOptionCtrlCmd while dragging, to create a circle with a diameter defined by the distance between the start and stop point of the drag (rather than the bounding box).
Hold ShiftCtrlCmd while dragging, combines the actions of both Shift and CtrlCmd.

By default the ellipse object inherits the current style, which is the last style applied to any object. Alternatively, tools can be configured to draw in their own unique style. This behavior can be changed on a tool by tool basis in Inkscape Preferences . (Right-click the Ellipse tool icon/button or use the keyboard shortcut CtrlCmdShiftP to open Preferences dialog.)
Once drawn, Fill and Stroke colors and Stroke width can be adjusted by:
Clicking on a color in the palette (Click for the fill, ShiftClick for the stroke).
Adjust the color in the Fill and Stroke Dialog.
Selecting a color with The Dropper Tool.
Copying and Pasting the style of another object.
Once you apply a style, it will become the new current style.
Modify an ellipse with the mouse
While the Ellipse tool is enabled the ellipse object will display modification handles - little square and circular handles.
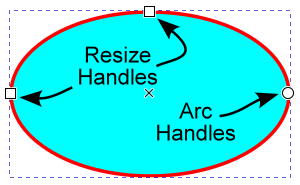
The square handles allow users to change the size of the ellipse.
The top square handle adjusts the ellipse vertically (Ry),
The left square handle adjusts the ellipse horizontally (Rx).
Holding CtrlCmd while dragging the square handles constrains the ellipse to a circle.
The circle handles (there are two, one on top of the other) allow users to draw arcs (open arcs or curves) or wedges/pie pieces (closed paths).
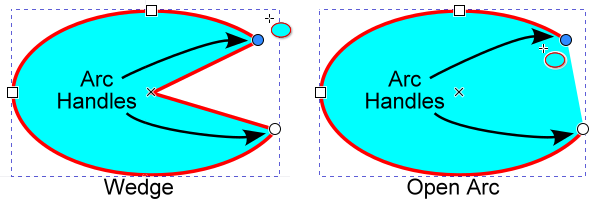
Once you grab a circle handle with the mouse, you can move your mouse away from the handle as you drag it. If you keep your mouse inside the original ellipse as you drag a circle handle, you will convert the original ellipse to an arc or open curve. If you keep your mouse outside the original ellipse as you drag a circle handle, the original ellipse becomes a closed wedge or pie piece. See the illustrations for a better understanding.
Hold the modifier keys as you drag, to perform special techniques:
Hold the CtrlCmd key as you drag a circle handle to force the handle to move in 15° increments or steps. You can change the default steps in Rotation snap angle.
Hold the Shift key while you drag a circle handle, to lock both handles as the ellipse rotates. Both handles move together.
Hold the CtrlCmdShift keys to rotate both locked circle handles in 15° steps.
Modify an ellipse with keyboard shortcuts
The cursor (arrow) keys can be used to move or adjust selected handles. Selected handles appear in the handle accent color.
You can combine modifier keys with arrow key presses to move the handles different distances.
Press AltOption + an arrow key for small adjustments. Zoom in for even finer adjustments.
Press Shift + an arrow for large adjustments.
See also
For more detail on using the AltOption and Shift modifiers, see the Transformations Section
Warning
Adjustments made with the arrow keys fail to update either the XML file or the Rx/Ry, Start/End entries in the Tool Controls bar.
Here are some workarounds:
Deselect the ellipse on the canvas, then re-select it. This causes the entry boxes on the tool controls bar to update. Now click inside one of the entry boxes and press EnterReturn. This causes the XML file to be updated.
Switch to Selection tool . Select the ellipse on the canvas. Press one arrow key and then press the opposite arrow key back again. This causes the Rx/Ry, Start/End entry boxes, and XML to all be updated.
(Ellipse handles adjusted using keyboard shortcuts update the entry boxes of the Object Properties dialog. But the XML file is not updated.) (CtrlCmdZ does not undo adjustments made with keyboard shortcuts.)
With an ellipse selected the [ or ] keys will rotate the ellipse in 15° steps (by default). The < (,) or > (.) keys will shrink or enlarge the ellipse. (See Transforms with keyboard ).
Note
When multiple objects are selected, the keyboard shortcuts will rotate and resize around the center of the selection area.
Ellipse and Arc tool controls bar

Rx: the horizontal radius of the ellipse
Ry: the vertical radius of the ellipse
Units: Select the units you want from the dropdown menu. (For more information, please see :doc:Inkscape Units</doc-management/document-setup/document-properties/display>)
Start: The angle from horizontal to the start circle handle.
End: The angle from horizontal to the end circle handle.
Icons: Switch to wedge (pie slice), open arc, closed arc, whole ellipse
Entry box arithmetic (+ add, - subtract , * multiply , / divide) is available, computation progresses from left to right.
With the Selection tool enabled
The ellipse can be modified using the transformation handles (See Transformation handles)
With the Node tool, or any shape tools enabled
The same modification handles are available on a selected ellipse, as if the Ellipse/Arc tool was enabled. You can even adjust the ellipse modification handles with these other tools.
Note
When multiple shape objects are selected only the Node tool will display the modification handles.
Adjustments with Object Properties dialog
Todo
revisit this part at a later point when the Object Properties chapter is done. New in 1.5, Fill and Stroke properties not yet available
Modify or view an ellipse with the XML Editor
Example Ellipse
Name |
Value |
units in mm (millimetres) |
|---|---|---|
ry |
23.044001 |
vertical ellipse radius Ry |
rx |
32.08136 |
horizontal ellipse radius Rx |
cy |
33.135674 |
vertical ellipse centre |
cx |
45.185009 |
horizontal ellipse centre |
id |
path1 |
|
style |
fill:#ff0000;—- |
CSS style properties |
Example Arc
Name |
Value |
units in mm (millimetres) |
|---|---|---|
d |
M 77.266369,33.135674 A…. |
SVG path |
sodipodi:arc-type |
slice |
Arc type |
sodipodi:end |
6.1936077 |
Arc end and start points |
sodipodi:start |
0 |
|
sodipodi:ry |
23.044001 |
Radii |
sodipodi:rx |
32.08136 |
|
sodipodi:cy |
33.135674 |
Center point |
sodipodi:cx |
45.185009 |
|
sodipodi:type |
arc |
|
id |
path1 |
|
style |
fill:#ff0000;…. |
CSS style properties |
In Inkscape, the Ellipse tool utilizes Sodipodi attributes to define arc shapes, particularly for parameters like the arc-type, arc end and start points.
These parameters are stored using XML attributes prefixed with sodipodi: within the Inkscape SVG code.
When the SVG is loaded into Inkscape these attributes are used to regenerate the SVG path d=”” attributes.
If exported as Plain SVG only the path will be saved (same as if applied Object to Path), if then reloaded into Inkscape the arc will no longer be editable as an ellipse.
Todo
Examples{link} using the Ellipse/Arc tool
Ellipses as thought bubble
Circle as 3D shaded sphere
Pie chart
Snowman