Grids
Grids, like guidelines, are used for precisely positioning or aligning objects on the canvas. A grid is typically used together with another Inkscape feature called snapping. (Learn details about snapping in the Snapping chapter.)
Inkscape offers three different kinds of grids: rectangular, axonometric (sometimes called isometric), and modular. Below are screenshots of three small sections of canvas, displaying each type.
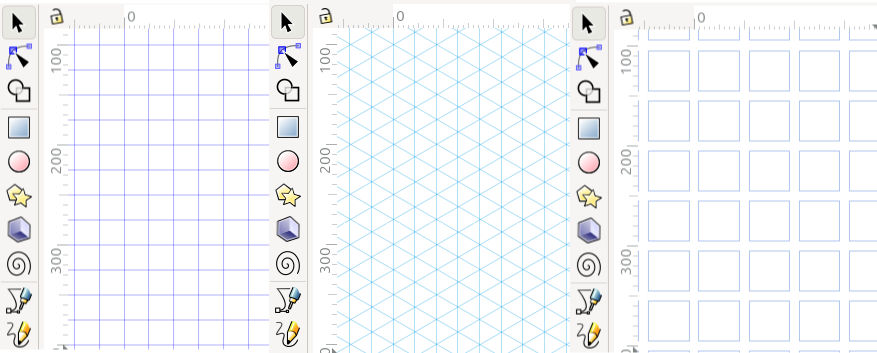
Rectangular, axonometric, modular grids
It is possible to create any number of grids on one Inkscape canvas. Although typically you would only display one at a time.
- There are three ways to enable grids.
View menu > Page grid
Shift + 3
Document Properties > Grid tab
Todo
Fix the code so that the line above a bullet list is not bold.
No matter which way you choose to enable a grid, you will still need to open Document Properties > Grid tab, to configure it to your unique needs.
Rectangular Grid
A rectangular grid is like ordinary graph paper, with parallel vertical and horizontal lines, at 90° angles. The image on the right shows the Grids tab in the Document Properties dialog, for a rectangular grid. With the settings you see there, a grid has been created on the canvas.
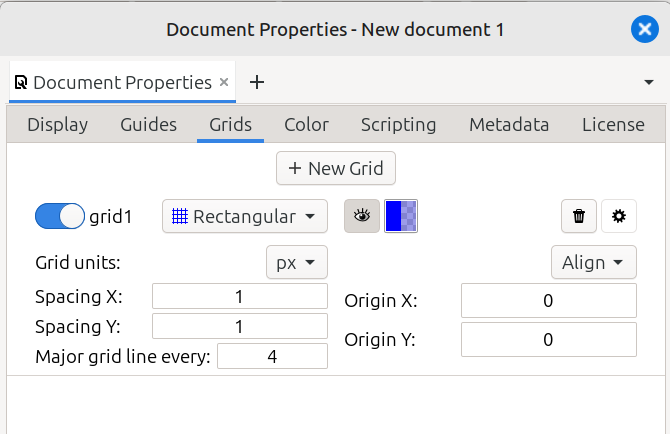
The table below explains what each option controls, and how to use it.
Option |
What it Does |
|---|---|
+ New Grid |
Click the button to create a new grid. |
grid1 |
Slide the button to the left to completely disable the grid. |
Rectangular |
A dropdown menu offering three different types of grids |
|
Click this button to disable the grid, yet still allow objects to snap to it. |
color box |
Click this box to change the color of rectangular grid lines. |
|
Click to delete this grid. |
|
Click to show checkboxes for 2 more options |
Grid units: |
Click to open the dropdown menu; choose your preferred units. |
Spacing X: |
Set how far apart are the horizontal units (vertical grid lines). |
Spacing Y: |
Set how far apart are the vertical units (horizontal grid lines). |
Major grid line every: |
This is how many spaces you want between major grid lines. Note that you often have to zoom in significantly, to see major and minor lines. |
Align: |
Click to open a small diagram, click a green dot to align the page. |
Origin X: |
Set the X coordinate for the grid origin. |
Origin Y: |
Set the Y coordinate for the grid origin. |
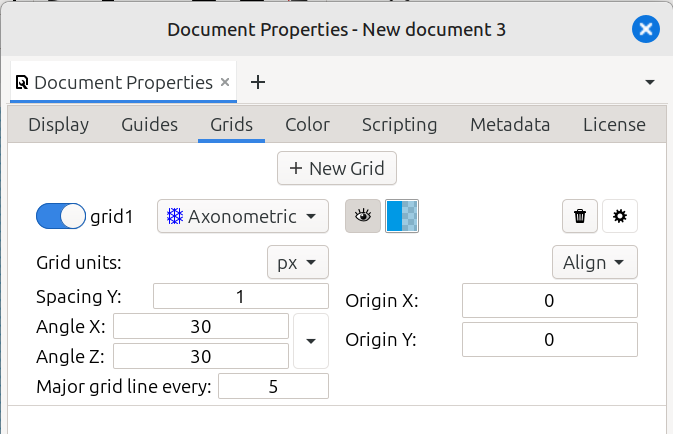
Axonometric Grid
An axonometric grid (sometimes called an isometric grid) is also made of parallel lines. Typically this grid will have vertical lines, plus lines at 30° and -30° to horizontal. You can see the example in the image above. The image on the left, below, shows what Document Properties > Grids tab looks like for axonometric grids.
Usually angles of the X and Z lines will be equal, or symmetric. But it is possible to create an axonometric grid where these angles will be different, or asymmetric.
The table below explains what each option controls, and how to use it.
Option |
What it Does |
|---|---|
+ New Grid |
Click the button to create a new grid. |
grid1 |
Slide the button to the left to completely disable the grid. |
Rectangular |
A dropdown menu offering three different types of grids. Click to drop the menu, then select Axonometric. |
|
Click this button to disable the grid, yet still allow objects to snap to it. |
color box |
Click this box to change the color of grid lines. |
|
Click to delete this grid. |
|
Click to display a snapping option. |
Grid units: |
Click to open the dropdown menu; choose your preferred units. |
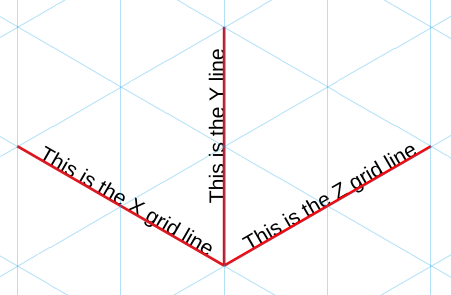
Spacing Y (see diagram, above right) |
Enter the height for the smallest diamond shapes. |
Angle X (see diagram, above right) |
Enter the degrees for the angle of the X line. |
Angle Z (see diagram, above right) |
Enter the degrees for the angle of the Z line. |
Set the aspect ratio |
Usually it’s easier to enter the angles. But if you like, you could enter 2:1, or 1:1, for example. |
Major grid line every: |
This is how many spaces you want between major grid lines. Note that you often have to zoom in significantly, to see major and minor lines. |
Align: |
Click to open a small diagram, then click a green dot to indicate how you want the page aligned. |
Origin X: |
Set the X coordinate for the grid origin. |
Origin Y: |
Set the Y coordinate for the grid origin. |
Modular Grid
A modular grid consists of blocks, or rectangles arranged in a grid, with optional gaps between them and optional margins around them. All of these elements are independently configurable, and snappable as well.
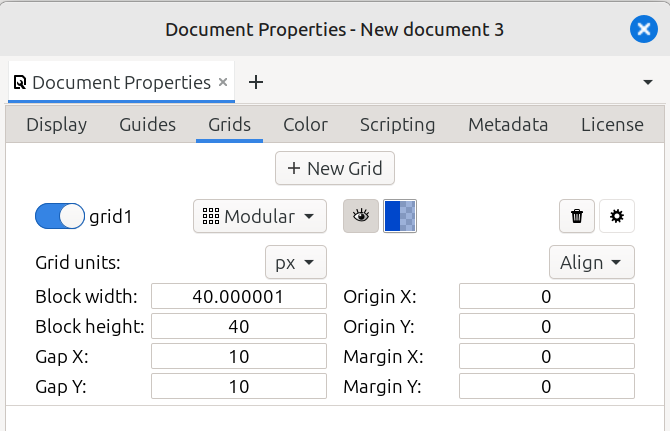
The table below explains what each option controls, and how to use it.
Option |
What it Does |
|---|---|
+ New Grid |
Click the button to create a new grid. |
grid1 |
Slide the button to the left to completely disable the grid. |
Rectangular |
A dropdown menu offering three different types of grids. Click to drop the menu, then select Modular. |
|
Click this button to disable the grid, yet still allow objects to snap to it. |
color box |
Click this box to change the color of grid lines. |
|
Click to delete this grid. |
|
Click to display a snapping option. |
Block width |
Enter the width you want for the grid’s blocks. |
Block height |
Enter the height you want for the grid’s blocks. |
Gap X |
Enter the width you want for the gaps between blocks. |
Gap Y |
Enter the height you want for the gaps between blocks. |
Align: |
Click to open a small diagram, then click a green dot to align the page. |
Origin X: |
Set the X coordinate for the grid origin. |
Origin Y: |
Set the Y coordinate for the grid origin. |
Margin X: |
Enter the value you want for the margins beside the blocks. |
Margin Y: |
Enter the value you want for the margins above and below the blocks. |
Other Grids
Using certain Live Path Effects or Extensions, Inkscape can draw different types of custom grids, which are not just for alignment or positioning. They are actual paths on the canvas. These grids can be rather node-heavy, and theoretically can cause Inkscape to run slow, or even crash, if they are very large or complex. It is recommended to make them small to start, and gradually enlarge them. You can learn more about them by following the given text links.
READY FOR REVIEW