There are now (in version 1.5) seven distinct areas providing a variety of information to Inkscape users. The image below shows those areas, highlighted in different colors.
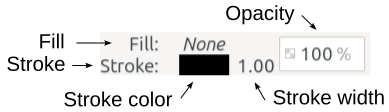
The first area, highlighted in pink, is called the Style Indicator. It provides all the style information for the selected object. Style information includes fill and stroke color, stroke width, and opacity.
The Layer Information is highlighted in green. It gives the layer the selected object occupies, whether the layer is visible
or hidden
, and locked
or unlocked
.
The Notification area, highlighted in blue, is the largest area of the status bar. If nothing is selected, it says “No objects selected. Click, Shift+click, Alt+scroll mouse on top of objects, or drag around objects to select.”
If something is selected, it gives three or four pieces of information.
the type of object, for example Star or Path or Text
if the object is a path, it gives the number of nodes
the layer it occupies
suggestions for what the user could do next, given the previous information
For example, this is what it says when a rectangular path is selected: “Path 4 nodes in layer Layer 1. Click selection again to toggle scale/rotation handles.”
Next is the red section. This is the position of the cursor – the X and Y pixel values. These values constantly change, as the mouse is moved.
In the yellow-green section, the tiny image of a camera and something that possibly looks like a tiny canvas or picture. This is a new feature in 1.5. Clicking the camera icon captures whatever is visible on the canvas. After zooming, or moving to a different area of the canvas, clicking the other button brings the focus of the canvas back to the position when the camera icon was clicked.
Next is the purple area, second from the right. This is the Zoom number field. It shows the zoom level and can set the zoom level.
The last area on the right, highlighted yellow, is the Rotation number field. It displays the status of rotation, and can set the rotation of the canvas.