Stars And Polygons
Inkscape’s Star and Polygon tool can create stars and other multi-sided polygons. The number of corners (or points) and the spoke ratio can be edited making it possible to create some very complex-looking objects; yet still, each one is a single object.
Draw a star or polygon
Select the Star/Polygon Tool from the main Toolbox along the left side of the window (keyboard shortcuts * or SHIFTF9)
Hold the primary mouse button and drag the mouse over the canvas until the desired size or shape is achieved. Then release the mouse button. Unlike rectangles and ellipses, stars are drawn from their center point, where you make your first click. The outer vertex of the star is where you release the mouse button.
While dragging, you can hold these modifier keys to constrain the star/polygon:
Hold the CtrlCmd key while dragging the vertex (outer handle), to force the star/polygon to rotate in 15° steps. Otherwise, it rotates freely. (See Rotation snap angle)
By default the star or polygon will display the current style, which is the last style applied to any object. Alternatively, tools can be configured to draw in their own unique style. This behavior can be changed on a tool by tool basis in Inkscape Preferences . (Right-click the Star/Polygon tool icon/button or use the keyboard shortcut CtrlCmdShiftP to open Preferences dialog.)
The color of the star or polygon can be changed by:
clicking on a color in the palette (Use Click to set the fill color, and ShiftClick to set the stroke color.)
adjusting the color in the Fill and Stroke Dialog
selecting a color with the Dropper Tool
copying and pasting the style of another object
Once a style is applied, it will become the new current style.
Modify a star or polygon object with mouse
When the Star tool is enabled, the object will display diamond-shaped modification handle(s).
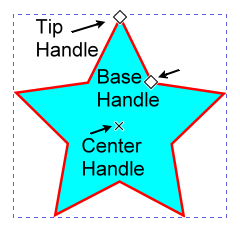
The star has two modification handles - the tip handle (outer vertex) and the base handle (inner vertex). Dragging either handle alters the Edge length and Spoke Ratio (values on the Star tool controls bar).
The base handle can be dragged past the center point to create some very complex star designs. However, such complex designs are not remembered for subsequent stars.
To identify a handle, hover your mouse over it, and look at the Status bar.
Hold the CtrlCmd key while dragging the Base handle, to constrain it’s movement along radial lines passing through the star’s center, and positioned halfway between adjacent vertex tips.
Hold the Shift key while dragging either handle to adjust the rounding of the corners. Drag the base handle over the center point to see extreme rounding. Drag perpendicular to that for more gradual rounding. Type a minus sign into the Rounded field for another design.
Hold the AltOption key while dragging either handle to adjust the randomization setting. For best results, drag perpendicular to the radial direction.
Additional stars drawn will inherit not only the fill and stroke but also Corners, Stroke Ratio (positive value only), Rounded and Randomized.
You can Clickdrag the center x handle to move the star’s position, without having to switch to the Selection tool.
Note
While the randomize parameter has the same distortion for any individual star, different stars have their own randomize seed value, so no two stars have the same distortion for a given randomize parameter number. Duplicates and clones, however, inherit the same seed value from the original.
Adjusting a star’s or polygon’s handles or parameters can create a vast array of interesting patterns, ranging from chaos to multi-faceted order. We can only say “Have fun!”

A variety of star shapes. Those in the blue square produced by entering values in the control bar entry fields. Those in the red square produced with mouse adjustments of the modification handles.
Tip
When you have created a complex star, try changing the Fill Rule (in the Fill and Stroke dialog) to achieve different patterns or variations.
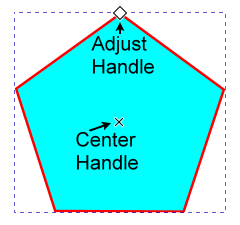
As opposed to stars, polygons only have one diamond-shaped handle. Adjusting it can resize and/or rotate the polygon.
Hold the CtrlCmd key while dragging the handle to constrain it to resizing only.
Hold the Shift key while dragging to adjust the rounding of the corners.
Hold the AltOption key while dragging to create randomization.
Warning
If a star object is changed to a polygon object (via tool controls bar, e.g. ), both handles will remain, but the base handle will not be adjustable. If that polygon is deselected and reselected, the base handle will disappear. Similarly, a polygon converted to a star object will be missing the base handle. But if the star object is deselected and reselected, both handles will once again be visible.
Modify a star or polygon object with keyboard shortcuts
The cursor (arrow) keys can be used to move selected handles horizontally and vertically.
Press the AltOption key + an arrow key for small adjustments. Zoom in for even finer adjustments.
Press the Shift key + an arrow key for large adjustments.
See also
For more detail on using the AltOption and Shift modifiers, see Transformations Section.
Warning
Adjustments made with the arrow keys fail to update the XML. And the value in the Spoke Ratio field, on the Tool Controls bar fails to change.
Work arounds:
Switch to the Selection tool . Move the star or polygon object one arrow keypress out. Then press the opposite arrow to move it back by one keypress. This causes both the Spoke Ratio field and the XML file to be updated.
With a star or polygon selected the [ or ] keys will rotate it in 15° steps. The < (,) or > (.) keys will resize the object smaller or larger (See Transforms with keyboard).
Note
With multiple objects selected, the keys will rotate and resize around the center of the selection area.
Tool Controls bar

Change: draw a polygon , or draw a star
Corners: the number of corners on a polygon or points on the star
Spoke Ratio: the ratio of the base radius to the tip radius (for stars only)
Rounded: the degree of corner rounding
Randomized: the degree to which corners and angles are randomly scattered
Default icon: resets the star or polygon values to defaults – Spoke Ratio 0.5, Rounded and Randomized 0.
Edge: the length of edges
Units: select your desired units from in, pt, pc, cm, m, mm, ft, px (See Inkscape Units)
Entry box arithmetic (+ add, - subtract , * multiply , / divide) is possible, computation progresses from left to right.
Tip
Spoke ratio (ratio of base radius to tip radius)
Some useful values:
jdawiseman.com/papers/easymath/surds_star_inner_radius.html
Basic Modifications
When the Selection tool is enabled
A star or polygon object can be modified using the transformation handles. (See Object Transformations)
When the Node tool or other shape tools are enabled
The same handles are available as when the Star/Polygon tool is enabled.
Note
When multiple shape objects are selected only the Node tool will display the modification handles.
Adjustments with Object Properties dialog
Todo
revisit this part at a later point when the Object Properties chapter is done.
Modify or view a star or polygon object with the XML Editor
Example Star
Name |
Value |
units in mm (millimetres) |
|---|---|---|
inkscape:transform-center-y |
2.5990791 |
|
d |
m 37.645209,82.585964 c… |
SVG path |
inkscape:randomized |
0 |
|
inkscape:rounded |
0.065 |
|
sodipodi:arg2 |
2.1418068 |
angle of base point |
sodipodi:arg1 |
1.5719793 |
angle of tip pt. (radians) |
sodipodi:r2 |
16.890036 |
r2 / r1 = spoke ratio |
sodipodi:r1 |
7.5788512 |
|
sodipodi:cy |
75.007118 |
star’s center point |
sodipodi:cx |
37.654175 |
|
sodipodi:sides |
5 |
Number of points/corners |
inkscape:flatsided |
false |
|
id |
path2 |
|
style |
fill: #ff0000;…. |
CSS style properties |
sodipodi:type |
star |
In Inkscape, the Star tool utilizes Sodipodi attributes to define star shapes, particularly for parameters like the number of points, inner and outer radii, and rounding of corners. These parameters are stored using XML attributes prefixed with sodipodi: and inkscape: within the Inkscape SVG code.
When the SVG is loaded into Inkscape these attributes are used to regenerate the SVG path d=”” attributes.
If it is exported as Plain SVG only the path will be saved (same as if it were converted from Object to Path). If the same SVG is now reloaded into Inkscape, the star object will no longer be editable using the Star/Polygon tool.
Todo
Examples{link} using star tool
Regular star
Flower
Mandala